Step 1: Review your ad groups budget.
You can either manually allocate a budget to each ad group or choose to leave 100% of the budget in each ad group. By leaving 100% of the budget, our advanced technology will automatically distribute funds to the top-performing ad group.
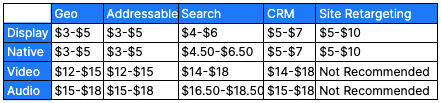
Step 2: Set up your ad groups bid range.
Minimum and maximum bids must be established in order to purchase inventory through real time bidding. To determine which bid range would be best for your ad group. Please view the below table.
Step 3: Frequency
Frequency allows you to set a limit on how frequently your ads can be displayed to each unique device ID.
Step 4: Day-Parting
Day-Parting allows you to control the specific days and times that your ads will be displayed.
Step 5: Select your audience type and desired audience segment.
To learn more how to create an audience please visit our Article | Audience Management Tool.
If your audience type is "geofencing", you may select a conversion zone to track foot-traffic conversions. To learn how to create a conversion location group, please visit our Article | How to Create a Conversion Zone.
Step 6: Audience Refinement
If applicable, you may refine your target audience by the following:
- Age
- Gender
- Geographic Area
Step 7: Add in Creative Assets
To learn how to upload creatives please visit our Video | How to use Creative Management
After uploading your desired creative assets, you may then assign your desired clickthrough URL.
The "Clickthrough URL" refers to the webpage your potential customers will land on when they click on your ads. You can apply a single clickthrough URL to the entire ad set or use unique URLs for each ad.
Video | How to Set-Up an Ad Group